In this post, we’re going to set up our development environment and create a minimally implemented Fabric mod with all the essentials in place. This section draws heavily on the “Getting Started” section of the developer guides and tutorials found on the official Fabric site.
Those guides were written for Fabric versions compatible with Minecraft 1.21.4, but most of the setup is identical for 1.21.6, which we’ll be targeting here. I recommend keeping that link handy — it explains core terminology and key features of Fabric, and is a solid resource even after you’ve finished this tutorial.
For context: I’m working on a Windows 11 Pro desktop with x64 architecture. You’ll definitely need JDK 21 installed to follow along. Like the Fabric documentation, I’ll assume you already have a basic understanding of Java and know your way around object-oriented programming (OOP).
What You’ll Need (We’ll walk through these one by one)
JDK 21 (Java Development Kit)
IntelliJ IDEA (Community Edition is fine)
Minecraft Development Plugin for IntelliJ
Fabric Template Mod Generator
Installing JDK 21
Before we begin, you’ll need to install the Java Development Kit (JDK) version 21. While playing Minecraft may have already installed the Java Runtime Environment (JRE), mod development requires the full JDK, which includes the JRE plus tools for compiling and debugging Java code. Even if you already have the JRE, installing the JDK won’t cause any conflicts — it’s a necessary step for building Fabric mods.
About Java
Java is a high-level, object-oriented programming language designed to be platform-independent—code written in Java is compiled into bytecode, which runs on any device with a Java Virtual Machine (JVM). Originally developed by Sun Microsystems and released in 1995, Java became widely popular due to its “write once, run anywhere” philosophy. Today, the reference implementation is OpenJDK, an open-source version maintained after Sun’s acquisition by Oracle. Java is still used extensively across platforms, with long-term support (LTS) versions like Java 8, 11, 17, and 21 receiving active maintenance. For development, you’ll use the Java Development Kit (JDK), which includes essential tools like the compiler and debugger—distinct from the lighter Java Runtime Environment (JRE), which is only for running applications.
Checking if Java is Already Installed
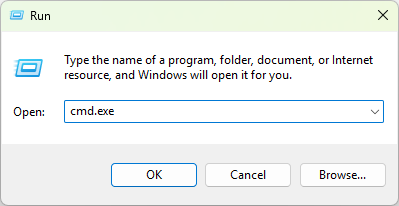
To check if Java is already installed on your system, start by opening the Command Prompt. You can do this by pressing Win + R, typing cmd.exe, and hitting Enter.
Once the Command Prompt window is open, type the following command and press Enter:
java -version
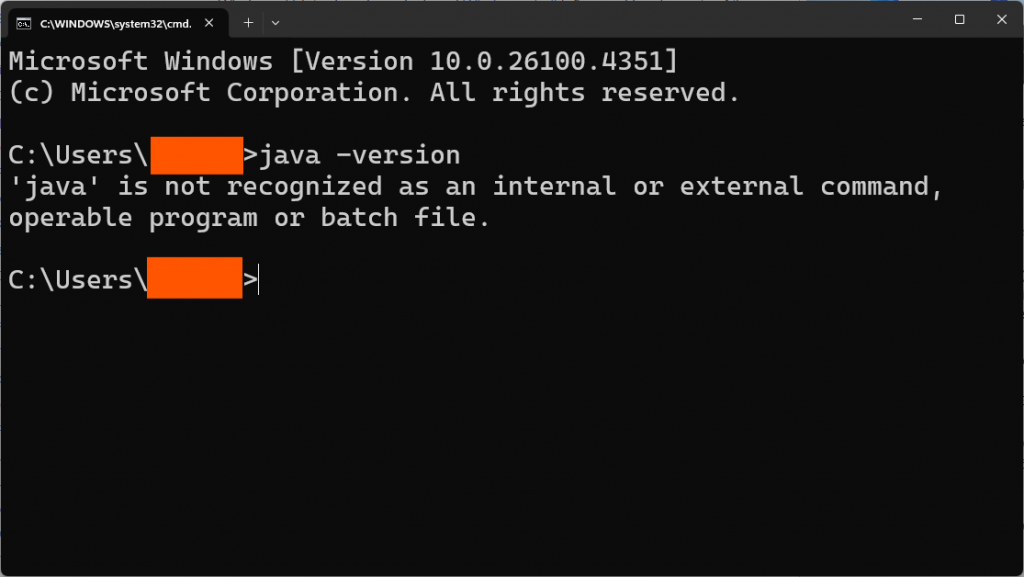
If Java is installed correctly, the command will display the installed version. If you see an error, the version is below 21, or it shows only a Java Runtime Environment (JRE), you’ll need to install or upgrade to JDK 21. For this tutorial, I started from a clean system to walk through the full setup from scratch.
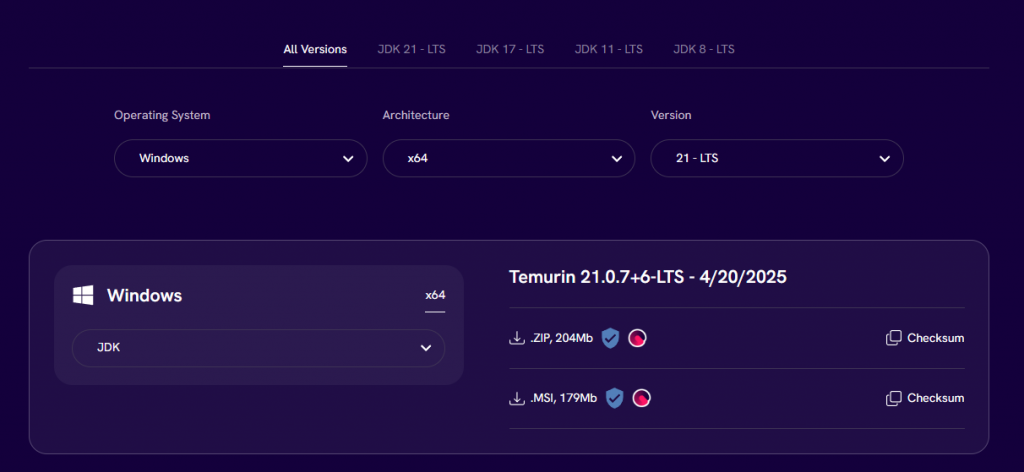
Downloading the Java 21 Installer
To install Java 21, head over to Adoptium. Download the Windows Installer (.msi) version of Temurin 21 (JDK) — this will provide everything you need in a simple, guided setup.
Why Adoptium?
We use Adoptium (Temurin) because it provides free, open-source Java builds based on the official OpenJDK, with easy installers, reliable updates, and no licensing issues. Unlike Oracle’s JDK, which may require a paid license for commercial use, Adoptium is fully open and safe for all projects. It offers the same core functionality with none of the legal or installation headaches — ideal for Minecraft modding.
Most modern systems use a 64-bit architecture, so you’ll likely want the x64 installer. If you’re using a newer Mac or device with an ARM-based chip (like Apple Silicon), choose aarch64. The older x86 (32-bit) option is no longer supported for Java 21, so if your system is 32-bit, you won’t be able to proceed with modding on this version. If you’re unsure, x64 is the safe choice for most Windows PCs.
For the remainder of this tutorial, we’ll proceed using x64, since that’s what I’m using on my modern Windows setup.
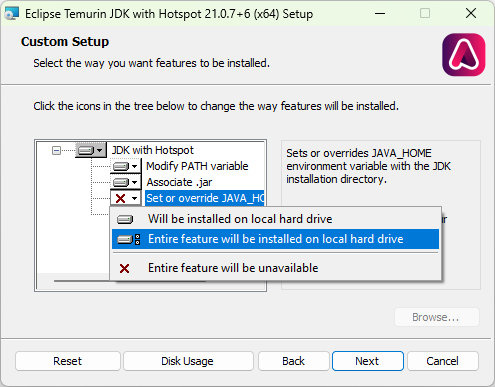
Run the Installer
Launch the installer and follow the prompts. On the custom setup screen, make sure to enable the following by selecting “Entire feature will be installed on local hard drive”:
Set JAVA_HOME environment variable – Adds Java to your system PATH.
During installation, Windows Security may prompt you asking whether you trust Eclipse Foundation (the provider of Adoptium) to make changes to your computer. This is expected. You can safely click Yes to continue — Adoptium is a trusted and widely used source for Java distributions.
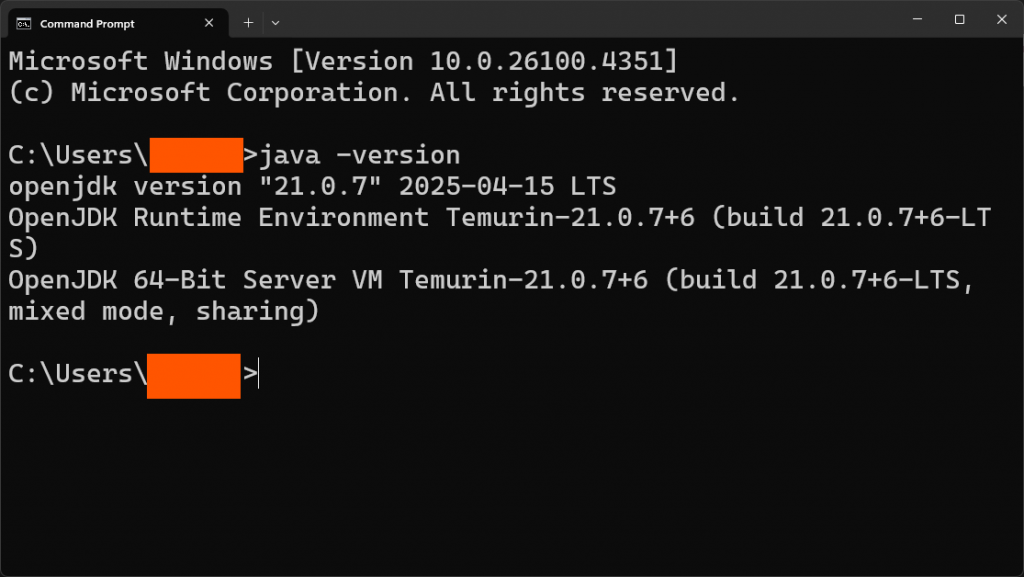
Verify That Java 21 Is Installed
Once the installation is complete, open the Command Prompt again and type java -version. If everything went smoothly, you should see output confirming that Java is installed and the version is 21 or higher. It should look something like this:
Installing IntelliJ IDEA
IntelliJ IDEA is a powerful integrated development environment (IDE) developed by JetBrains, tailored for Java and other JVM-based languages like Kotlin and Groovy. It’s available in two versions: a free, open-source Community Edition, and a Commercial Edition with additional features. Both are suitable for professional development, but for Fabric modding, the Community Edition is more than sufficient—and recommended.
While you’re free to use other IDEs like Eclipse or Visual Studio Code, this guide (as well as the official Fabric documentation) assumes you’re using IntelliJ IDEA. If you opt for another IDE, be sure to refer to its own documentation when needed.
If you don’t have IntelliJ IDEA installed yet, you can download it from the official website. You may need to scroll down to find the Community Edition—it looks like this:
Once you’ve downloaded the installer, follow the on-screen instructions to install IntelliJ IDEA. There’s no special configuration required—just accept the defaults unless you know you need something specific. If Windows prompts you to confirm that JetBrains software can make changes to your computer, it’s safe to approve.
Installing IDEA Plugins
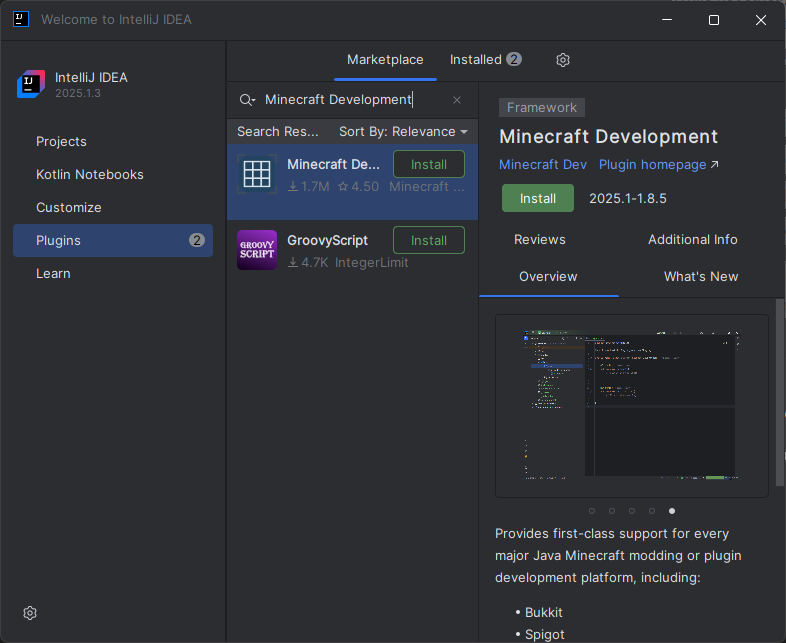
Although not strictly required, the Minecraft Development plugin is highly recommended. It adds helpful tools and integrations that make modding with Fabric significantly easier.
To install it:
From within IntelliJ IDEA: Open IntelliJ and navigate to File > Settings > Plugins, then select the Marketplace tab. Search for Minecraft Development and click Install.
From the Welcome Screen: If you’re still on the “Welcome to IntelliJ IDEA” screen, click Plugins, switch to the Marketplace tab, search for Minecraft Development, and install it from there.
Install from disk (optional): You can also download the plugin manually from the JetBrains Plugin Repository and install it via File > Settings > Plugins > Install Plugin from Disk.
No matter which method you use, you’ll need to restart IntelliJ IDEA for the plugin to take effect.
Creating Your First Fabric Mod Project
Fabric offers a simple way to generate a new mod project using the Fabric Template Mod Generator. While it’s also possible to create a project manually using the example mod repository, we’ll cover that in a future blog post. If you’re eager to try it yourself, you can refer to the Manual Project Creation section in the official Fabric developer guide.
To get started, open the template generator and fill out the following:
Mod Name: This sets both the display name of your mod and, unless changed, the mod ID. You can click “Use custom id” to manually define a lowercase ID (like strawberry) if the default doesn’t suit you.
Package Name: This should be a unique Java-style namespace. A common convention is to reverse your domain name.
Example:
If your website is epicbunny.dev and your mod is Strawberry, a good package name would be: dev.epicbunny.strawberry
Minecraft Version: Choose the version you’re targeting—likely 1.21.6 if you’re following this tutorial.
In the Advanced Options, there are several additional toggles. For now, you can leave them unchecked unless you know you need them:
Kotlin Programming Language
Mojang Mappings
Data Generation
Note:
The Split client and common sources option is checked by default. This sets up two source folders—main for shared logic and client for code that should only run on the Minecraft client (like rendering). It helps prevent server crashes from client-only code and is recommended for most mods.
Once you’ve filled in the fields, click Download Template (.ZIP). Extract the zip to a location of your choice, and then open the extracted folder in IntelliJ IDEA to begin your modding journey.
Note:
The downloaded ZIP file will have a name like strawberry-template-1.21.6.zip. When extracting it, you may want to rename the folder to something simpler—like just strawberry—to make it easier to identify when importing it into IntelliJ IDEA.
Security Notice
When you open your newly generated mod folder in IntelliJ IDEA, you’ll likely see a prompt like:
“Trust and Open Project ‘strawberry’?”
This is a standard IntelliJ IDEA warning. It appears whenever you open a new project to help protect you from potentially unsafe code.
✅ You can safely click Trust Project. Optionally, you may also see:
“Trust all projects in ‘[folder]’” – This will trust other projects located in the same folder as this one (adjust accordingly if you’re using a different directory layout).
“Add IDE and [project folder] to the Microsoft Defender exclusions list” – This can improve IDE performance. Only available if you have administrator rights.
⚠️ Security Prompt from JetBrains
After clicking Trust Project, Windows may show a User Account Control (UAC) prompt asking if you trust a program called elevator.exe by JetBrains s.r.o.
This is normal and safe — it’s used to grant IntelliJ the permissions it needs to make changes (like indexing files or configuring the build tools).
✅ You can click Yes to continue.
Importing the Project
Once you open the project folder in IntelliJ IDEA, the IDE should automatically detect the build.gradle file and begin setting up the project using Gradle. In most cases, this process happens automatically without any need for manual input.
What is Gradle?
Gradle is a powerful build automation tool used for compiling, managing dependencies, packaging, and deploying software. It’s especially popular in Java development and is the default build system for many Minecraft modding projects. Gradle uses a scripting language (Groovy or Kotlin) to define tasks and dependencies in a flexible, human-readable way. It ensures everything in your project builds in the correct order by using a dependency graph, and it supports features like incremental builds, caching, and parallel execution to speed things up. In the context of Minecraft modding, Gradle handles downloading Minecraft libraries, setting up mappings, and building your mod into a .jar file ready to test or distribute.
If IntelliJ shows a notification asking whether to import the Gradle build script, simply click “Import Gradle Project” to continue. This ensures that all dependencies and build tasks are configured correctly.
Once the setup is complete, you should see the project’s file structure appear in the Project view. At this point, you’re ready to start developing your mod.
Understanding the Project Folder Structure
Once you generate your mod with the Fabric Template Mod Generator and open it in IntelliJ IDEA, you’ll see several folders and files. Most of them exist to support the build system and won’t need your attention. Here’s what actually matters — and what you can safely ignore.
src/ — Where All the Modding Happens
This is your main workspace. If you only remember one folder, it’s this one.
src/├── main/│ ├── java/ ← your mod logic│ └── resources/ ← mod metadata, textures, language files, etc.└── client/ ├── java/ ← rendering, keybinds, client-only code └── resources/ ← client-only mixin config
This layout was created with the Split client and common sources option enabled (see earlier note). It keeps client-only code like rendering separate from logic that runs on both the client and server.
Most of your work will happen in:
src/main/java: main mod logic (like Strawberry.java)
src/main/resources: includes fabric.mod.json and your assets
src/client/java: rendering, GUIs, input events
What are mixins?
Mixins let you modify Minecraft’s internal code without editing the source directly. You’ll use them when you need to inject or override behavior in vanilla classes like PlayerEntity. You don’t need to dive into mixins right away — most mods won’t touch them until much later.
Root Files — What You Might Touch
Most files in your project’s root folder are related to Git or Gradle and can be left alone. These two are the ones you’ll actually edit:
build.gradle – Controls your mod’s setup, dependencies, and ID ✅
LICENSE – Defines how others can use your mod ✅
Everything else — like .gitignore, .gitattributes, gradlew, or settings.gradle — supports the build tools and can safely be ignored while you develop.
Configuring Your Mod with fabric.mod.json
The fabric.mod.json file is the main configuration file for your mod. Fabric Loader uses this to understand what your mod is, where it starts, what it depends on, and how it interacts with Minecraft.
You’ll find it in src/main/resources/, and it gets bundled into your mod’s .jar when you build.
Key Fields
Here are the fields you’ll use most often:
id – Your mod’s unique identifier (lowercase, no spaces). This is how other mods reference yours.
name – The human-readable name shown in mod menus.
version – The version of your mod. Often set to ${version} and pulled from gradle.properties.
environment – Where the mod runs:
"client" – Only loaded on the client
"server" – Only loaded on the server
"*" – Loaded everywhere (most common)
entrypoints – Tells Fabric where your mod starts.
"main" is for shared (common) code
"client" is for client-only setup (like renderers)
depends – A list of required dependencies and version constraints.
mixins – Lists mixin configuration files for modifying Minecraft internals.
There are other optional fields too, like:
description – Shown in mod menus and logs.
authors, contact, and license – Metadata about you and your project.
suggests – Optional mods that pair well with yours, but aren’t required.
This is the fabric.mod.json used in the reference project for this tutorial. It’s been unmodified since the template generator created it:
{"schemaVersion":1,"id":"strawberry","version":"${version}","name":"Strawberry","description":"This is an example description! Tell everyone what your mod is about!","authors":["Me!"],"contact":{"homepage":"https://fabricmc.net/","sources":"https://github.com/FabricMC/fabric-example-mod"},"license":"CC0-1.0","icon":"assets/strawberry/icon.png","environment":"*","entrypoints":{"main":["dev.epicbunny.strawberry.Strawberry"],"client":["dev.epicbunny.strawberry.StrawberryClient"]},"mixins":["strawberry.mixins.json",{"config":"strawberry.client.mixins.json","environment":"client"}],"depends":{"fabricloader":">=0.16.14","minecraft":"~1.21.6","java":">=21","fabric-api":"*"},"suggests":{"another-mod":"*"}}
Once this file is set up, Fabric Loader knows how to bootstrap your mod, where to find your code, and what it needs to function. You won’t need to change this constantly — but understanding it is critical when you’re creating new entrypoints, adding dependencies, or working with mixins.
What’s an Entrypoint?
In Fabric, an entrypoint is the main class where your mod begins execution. It’s the first bit of your code Fabric Loader calls during Minecraft’s startup, giving your mod a chance to register items, blocks, event handlers, and more.
Your fabric.mod.json file tells Fabric which entrypoints exist and where to find them. The most common entrypoints are:
"main" – Runs on both client and server
"client" – Runs only on the client (e.g., for renderers or UI)
"server" – Optional, runs only on dedicated servers
Example: A Basic Mod Entry Point
Here’s the Strawberry class that’s registered as the "main" entrypoint in our example mod:
packagedev.epicbunny.strawberry;importnet.fabricmc.api.ModInitializer;importorg.slf4j.Logger;importorg.slf4j.LoggerFactory;publicclassStrawberryimplementsModInitializer{publicstaticfinalStringMOD_ID="strawberry";// This logger is used to write text to the console and the log file.// It is considered best practice to use your mod id as the logger's name.// That way, it's clear which mod wrote info, warnings, and errors.publicstaticfinalLoggerLOGGER=LoggerFactory.getLogger(MOD_ID);@OverridepublicvoidonInitialize(){// This code runs as soon as Minecraft is in a mod-load-ready state.// However, some things (like resources) may still be uninitialized.// Proceed with mild caution.LOGGER.info("Hello Fabric world!");}}
This class implements ModInitializer, which is the interface Fabric calls for "main" entrypoints. The onInitialize() method is your mod’s startup hook — it’s a good place to:
Register custom blocks or items
Set up event listeners
Log basic boot info
As your mod grows, you won’t want to cram everything into your entrypoint. It’s standard practice to create separate classes for content registration:
ModItems → for defining and registering custom items
ModBlocks → for your custom blocks and block entities
ModEntities, ModSounds, ModScreens, etc. as needed
These are just plain Java classes — keeping logic modular this way makes your codebase easier to read, extend, and debug — especially as your mod grows in complexity.
If you define a "client" entrypoint in fabric.mod.json, the class for that should implement ClientModInitializer instead. We’ll get to that some other time when we deal with rendering and screen logic.
Quick Note: File Paths vs. Class Names
You might’ve noticed that the file for Strawberry.java lives in this folder:
That’s not a coincidence — Java’s package system mirrors your folder structure. Here’s how it breaks down:
src/main/java is the root of your code
dev.epicbunny.strawberry is your package name
Strawberry is your class
Putting your code into a proper package (instead of using the default one) is required for Fabric mods, and helps prevent naming conflicts with other mods.
Why use a package like dev.epicbunny.strawberry?
This format is based on reverse-domain naming conventions (like com.example.project). It keeps your mod’s class names unique — especially important when hundreds of mods are loaded into the same game.
Launching the Game
Once your mod is set up, you’ll probably want to test it in Minecraft — and that’s where Fabric Loom comes in.
Fabric Loom is the Gradle plugin that wires everything together. It manages your mod’s dependencies, builds the final .jar, and sets up launch profiles so you can easily run or debug your mod inside IntelliJ IDEA.
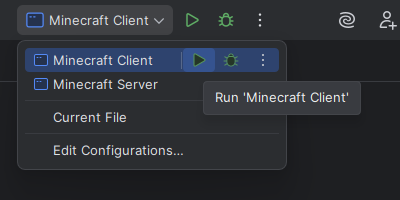
Launch Profiles (IntelliJ)
In IntelliJ IDEA, you’ll see a dropdown in the top-right corner of the window — that’s where your run configurations live. Fabric Loom automatically sets these up when you import the project.
You’ll typically see:
Minecraft Client – Launches the game with your mod
Minecraft Client (Debug) – Indicated by the green bug icon, it’s the same as above, but with a debugger attached
Minecraft Server – Launches a headless Minecraft server (useful for testing server-side logic)
Just pick one and hit the green ▶️ to run it. The client will boot with your mod active.
Tip: Use Debug Mode When Testing
Using the debug version of the launch profile lets you set breakpoints, inspect variables, and step through your code in real-time — super handy for troubleshooting.
If you’re just checking whether something loads or renders correctly, the normal client is fine. But for anything deeper (e.g., a crash when placing your block), debug mode is the way to go.
Gradle Tasks (Command Line)
If you prefer working in a terminal, you can also launch Minecraft using Gradle tasks:
./gradlew runClient # Starts the game with your mod loaded./gradlew runServer # Starts a dedicated server with your mod
This works well for quick testing, but you won’t get debugging tools like you do in IntelliJ. For development, sticking with the built-in launch profiles is usually the better experience.
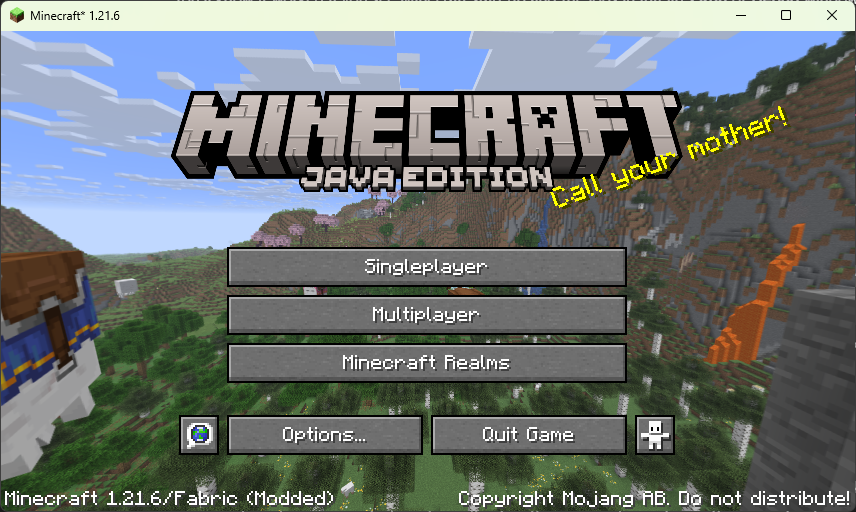
What to Expect If It’s Working
If everything is configured correctly, Fabric Loom will:
Download Minecraft and Fabric dependencies.
Compile your mod.
Launch a modded instance of Minecraft with your test player.
You’ll know it worked if you see Minecraft start up and the logs in IntelliJ’s Run or Debug window include something like this:
That last line — Hello Fabric world! — comes from the Strawberry.java class you wrote earlier. Seeing it means your mod was loaded successfully and your entrypoint ran.
You’ll also see a full list of all mods loaded, including fabric-api and your own mod (strawberry). It’ll look something like this:
Once the game is running, you can playtest your mod just like a normal game. If you added blocks, commands, or logging — which we haven’t yet — this is your chance to see them in action!
That’s it for the setup! At this point, you’ve got a working development environment, a test mod that launches, and a clear understanding of how the project is structured. In the next post, we’ll dive into something a little more exciting — adding your very first custom item to the game. Future lessons will aim to be a bit shorter and more focused, so you can digest each step without needing a full lunch break. See you there!


![The standard IntelliJ IDEA warning.
Trust and Open Project 'strawberry'?
IntelliJ IDEA 2025.1.3 provides features that may execute potentially malicious code from this folder. If you don't trust the source, preview the project in the safe mode to only browse its code.
checkbox for Trust all projects in 'Documents' folder
checkbox for Add IDE and strawberry folders to the Microsoft Defender exclusions list
This will improve IDE performance. You must have administrator rights to use it.
[Trust Project] [Preview in Safe Mode] [Don't Open]](https://epicbunny.dev/wp-content/uploads/2025/06/Screenshot-2025-06-26-122520.png)

Leave a Reply