Minecraft is all about blocks—they shape the world, define its materials, and power everything from redstone contraptions to cozy cottages. That makes adding your own block one of the most fun and satisfying ways to start modding.
In this part of the tutorial, we’ll walk through how to add your own custom block to Minecraft using Java and the Fabric modding framework. You’ll learn how blocks are defined, registered, and made available to the game—and by the end, you’ll have a soft, chewy bubble gum block ready to place in the world. Let’s get started!
If you’ve wound up on this page, make sure you’ve read Fabric Modding: Creating Your First Item
The ModBlocks Class, and Our First Block
So like ModItems, we’ll make a separate class for handling all our block additions to the game. Like that class, we’ll also have a register method, but this time, we’ll make helper functions for setting up registry keys for the item, like last time, but also for the block:
package dev.epicbunny.strawberry;

import java.util.function.Function;
import net.minecraft.block.AbstractBlock;
import net.minecraft.block.Block;
import net.minecraft.item.BlockItem;
import net.minecraft.item.Item;
import net.minecraft.registry.Registries;
import net.minecraft.registry.Registry;
import net.minecraft.registry.RegistryKey;
import net.minecraft.registry.RegistryKeys;
import net.minecraft.util.Identifier;

public class ModBlocks {

    private static Block register(
            String name,
            Function<AbstractBlock.Settings, Block> blockFactory,
            AbstractBlock.Settings settings,
            boolean shouldRegisterItem
    ) {
        // Create a registry key for the block using mod ID and block name
        RegistryKey<Block> blockKey = keyOfBlock(name);

        // Build the block with the provided settings and assign the registry key
        Block block = blockFactory.apply(settings.registryKey(blockKey));

        // Optionally create and register a BlockItem for the block
        if (shouldRegisterItem) {
            // Generate a registry key for the item using the same name
            RegistryKey<Item> itemKey = keyOfItem(name);

            // Create a new BlockItem linked to the block with its own registry key
            BlockItem blockItem = new BlockItem(
                    block,
                    new Item.Settings().registryKey(itemKey)
                            .useBlockPrefixedTranslationKey()
            );

            // Register the item with the item registry
            Registry.register(Registries.ITEM, itemKey, blockItem);
        }

        // Register the item with Minecraft's block registry.
        Registry.register(Registries.BLOCK, blockKey, block);

        return block;
    }

    // Build a block registry key using the mod ID and name
    private static RegistryKey<Block> keyOfBlock(String name) {
        return RegistryKey.of(
                RegistryKeys.BLOCK,
                Identifier.of(Strawberry.MOD_ID, name)
        );
    }

    // Build an item registry key using the mod ID and name
    private static RegistryKey<Item> keyOfItem(String name) {
        return RegistryKey.of(
                RegistryKeys.ITEM,
                Identifier.of(Strawberry.MOD_ID, name)
        );
    }
}
What the register method does
The register method in ModBlocks is responsible for creating and registering a new block in Minecraft. It takes four arguments that define the block’s identity, construction, and whether it should have an associated item:
name: The name of the block, like"bubble_gum_block". Combined with your mod ID, this becomes the full identifier (e.g.,strawberry:bubble_gum_block).blockFactory: This is the function that builds the block. For most basic blocks, you’ll useBlock::new, but you can also use custom block classes later.settings: These control the block’s behavior—how strong it is, what sounds it makes, whether it requires a tool, and so on. Think of this as the blueprint that shapes the block’s in-game properties.shouldRegisterItem: A boolean that decides whether to also create and register aBlockItem(so the block shows up in inventories like the creative menu). Most blocks will want this set totrue, but you can turn it off for technical blocks.
Breaking it down further
    // Build a block registry key using the mod ID and name
    private static RegistryKey<Block> keyOfBlock(String name) {
        return RegistryKey.of(
                RegistryKeys.BLOCK,
                Identifier.of(Strawberry.MOD_ID, name)
        );
    }

    // Build an item registry key using the mod ID and name
    private static RegistryKey<Item> keyOfItem(String name) {
        return RegistryKey.of(
                RegistryKeys.ITEM,
                Identifier.of(Strawberry.MOD_ID, name)
        );
}These helper functions generate registry keys for our blocks and their items. They work just like the key creation code we used earlier in ModItems, but now we’ve split them out into named methods. This doesn’t change how anything works—it just makes the code a little cleaner and easier to update later if we ever need to refactor how our keys are created. Whether you use this approach is up to you, but for consistency, you might want to adopt it in ModItems too.
Block block = blockFactory.apply(settings.registryKey(blockKey));- This creates the actual
Blockusing the provided settings. - The registry key is embedded in the settings so the item knows its identity.
Registry.register(Registries.BLOCK, blockKey, block);- This officially adds your block to Minecraft’s global block list.
- Now it can be placed in the world, referenced in commands, used in building, included in recipes, and behave like any other block in the game.
        // Optionally create and register a BlockItem for the block
        if (shouldRegisterItem) {
            // Generate a registry key for the item using the same name
            RegistryKey<Item> itemKey = keyOfItem(name);

            // Create a new BlockItem linked to the block with its own registry key
            BlockItem blockItem = new BlockItem(
                    block,
                    new Item.Settings().registryKey(itemKey)
                            .useBlockPrefixedTranslationKey()
            );

            // Register the item with the item registry
            Registry.register(Registries.ITEM, itemKey, blockItem);
}In Minecraft, blocks that players can place and pick up need an item version too. This is what BlockItem handles — it’s the item that appears in your inventory and lets you place the block in the world.
This block of code checks if shouldRegisterItem is true. If it is, we create a BlockItem (which is just an Item that knows how to place the block it’s tied to) and give it its own registry key.
Finally, we register that item in the same way we’d register any other item — adding it to Minecraft’s global item list.
If you don’t want your block to have an item form (for example, if it’s a technical or invisible block), you can skip this step by passing false to the register() method.
Small edit (6/27/2025)
I added theuseBlockPrefixedTranslationKeyfor stylistic reasons pertaining to language files. We might explain in a future blog post, but it’s not important right now for the purposes of this specific tutorial.
Actually registering the block
Let’s finish setting up by creating the bubble_gum_block and making sure it gets loaded when the game starts. Here’s the rest of the ModBlocks class:
    public static void initialize() {
        // Called during mod initialization to register our blocks.
    }

    // Define and register bubble_gum_block with desired settings
    public static final Block BUBBLE_GUM_BLOCK = register(
            "bubble_gum_block",
            Block::new,
            AbstractBlock.Settings.create(),
            true // register an item version of the block
);In your main mod class, make sure you call initialize. Remember, this is a required step, or else your new block won’t be added.
ModBlocks.initialize();Now let’s launch Minecraft again and give ourselves the block…
/give @p strawberry:bubble_gum_block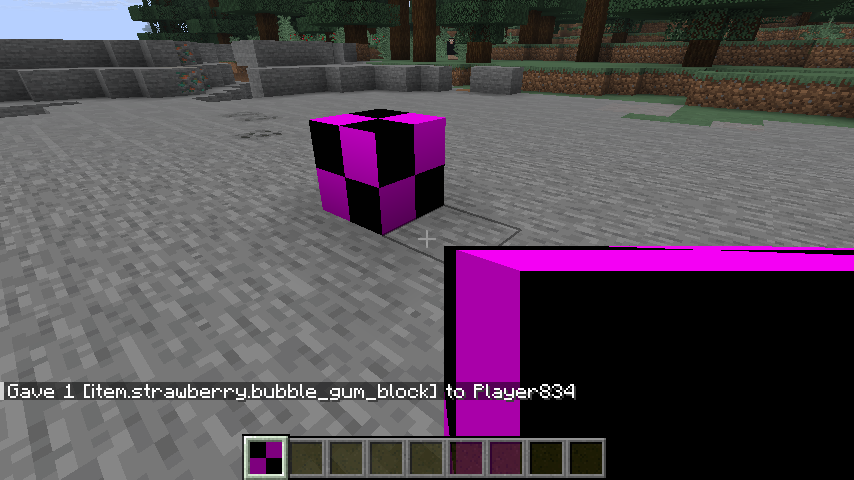
You should now see your brand-new block in the game! You won’t be able to do much with it just yet—and like before, it’ll probably appear as a purple-and-black checkered cube. That’s Minecraft’s default look for blocks with no model or texture defined.
But don’t worry—we’re just getting started. In the next steps, we’ll improve our new block (and its item form) by adding proper models, textures, a readable name, and support for creative mode tabs.
🎉 Congrats—you just added your first custom block to Minecraft!

Hello, I’m trying to add a new leave block but it doesn’t looks like the other ones in game. I mean it looks like in fast graphics mode. I can’t see the transparent parts when I place the block. But I can see it in my inventory.
Nevermind I solved it. Btw thanks for the tutorial, when is the new post?
Wow, congrats! I might email you later for details, but I wasn’t able to respond as I am still on my day job.
I am writing the next post now, but it’s a bit lengthy because I wanted to address some of the differences in the way items are registered differently in versions 1.21.5 and beyond. The main issue with the documentation found at https://docs.fabricmc.net/ is that it’s written for previous versions which had a bunch of special classes, such as SwordItem, that you used as templates for making certain items. Now though, they use builder methods, and I thought while I was tutorial-izing the “fire sword” that someone else wrote me about, it was a good chance to talk about the differences and show examples between the two.
I may email you separately about your issues, even if you solved them. Usually, the issues developers have are small, based on a minor mistake or misunderstanding, and they don’t get documented, which might be helpful for someone else.