Minecraft is a game built around blocks—breaking them, placing them, crafting new ones. That’s why most beginner modding tutorials start by adding new content like blocks and items, rather than jumping into complex functionality. And that’s a great place to begin! With just a bit of code, you can start building your own creative additions to the game.
In this tutorial, we’ll walk through how to add a custom item to Minecraft using Java and the Fabric modding framework. Along the way, you’ll learn how Minecraft’s item registry works, how items are constructed, and how to hook your code into the game’s loading process.
Let’s start by adding something simple: bubble gum.
If you haven’t yet, make sure you’ve previously set up your development environment.
The ModItems Class, and Our First Item
Minecraft has a built-in Items class that registers all of its official items. We’ll take inspiration from that—along with the official Fabric Developer Guide—to create our own ModItems class inside the src/main/java/dev/epicbunny/strawberry folder.
This class will handle all our item registrations going forward:
package dev.epicbunny.strawberry;

import net.minecraft.item.Item;
import net.minecraft.registry.Registries;
import net.minecraft.registry.Registry;
import net.minecraft.registry.RegistryKey;
import net.minecraft.registry.RegistryKeys;
import net.minecraft.util.Identifier;

import java.util.function.Function;

public class ModItems {

    public static Item register(
            String name,
            Function<Item.Settings, Item> itemFactory,
            Item.Settings settings
    ) {
        // Create a unique registry key for this item.
        RegistryKey<Item> itemKey = RegistryKey.of(
                RegistryKeys.ITEM,
                Identifier.of(Strawberry.MOD_ID, name)
        );

        // Create the item instance using the provided factory and settings.
        Item item = itemFactory.apply(settings.registryKey(itemKey));

        // Register the item with Minecraft's item registry.
        Registry.register(Registries.ITEM, itemKey, item);

        return item;
    }
}
What the register method does:
name: This is the in-game name of your item (like"bubble_gum").itemFactory: This is the function that builds your item. For now, you’ll usually useItem::new, but later you could use something likeFoodItem::newor a custom class.settings: This controls item behavior—stack size, fire resistance, creative tab, etc. Think of it like the blueprint for your item.
Breaking it down further
RegistryKey<Item> itemKey = RegistryKey.of(
        RegistryKeys.ITEM,
        Identifier.of(Strawberry.MOD_ID, name)
);
- This creates a unique ID for the item, like
strawberry:bubble_gum. RegistryKeys.ITEMtells Minecraft: this key is for an item.
Item item = itemFactory.apply(settings.registryKey(itemKey));
- This creates the actual
Itemusing the provided settings. - The registry key is embedded in the settings so the item knows its identity.
Registry.register(Registries.ITEM, itemKey, item);
- This officially adds the item to Minecraft’s global item list.
- Now it can be used in commands, creative tabs, crafting, etc.
Actually registering the item
Let’s finish setting up by creating the bubble_gum item and making sure it gets loaded when the game starts. Here’s the rest of the ModItems class:
    public static void initialize() {
        // Called from the main mod class to register items
    }

    public static final Item BUBBLE_GUM = register(
            "bubble_gum",
            Item::new,
            new Item.Settings()
    );
And now, open your main mod class — the one that implements ModInitializer (like this):
package dev.epicbunny.strawberry;

import net.fabricmc.api.ModInitializer;
import org.slf4j.Logger;
import org.slf4j.LoggerFactory;

public class Strawberry implements ModInitializer {
	public static final String MOD_ID = "strawberry";

	// Logger used to write messages to console and log files.
	// Using the mod ID as the logger name helps identify the source of logs.
	public static final Logger LOGGER = LoggerFactory.getLogger(MOD_ID);

	@Override
	public void onInitialize() {
		// Runs when Minecraft is ready to load mods.
		// Some systems (like resources) may still be initializing,
		// so it's best to avoid assumptions and initialize only safe logic.

		// Log a simple confirmation message on mod startup
		LOGGER.info("Hello Fabric world!");

		// Initializes ModItems, loading items from its static variables
		ModItems.initialize();
	}
}
This step is required!
If you forget to call ModItems.initialize(), your item won’t be created, and Minecraft will act like it doesn’t exist — no errors, just nothing there. That initialize() method is what triggers the actual registration and makes your item usable in-game.
Once that’s all in place, launch Minecraft and try:
/give @p strawberry:bubble_gum
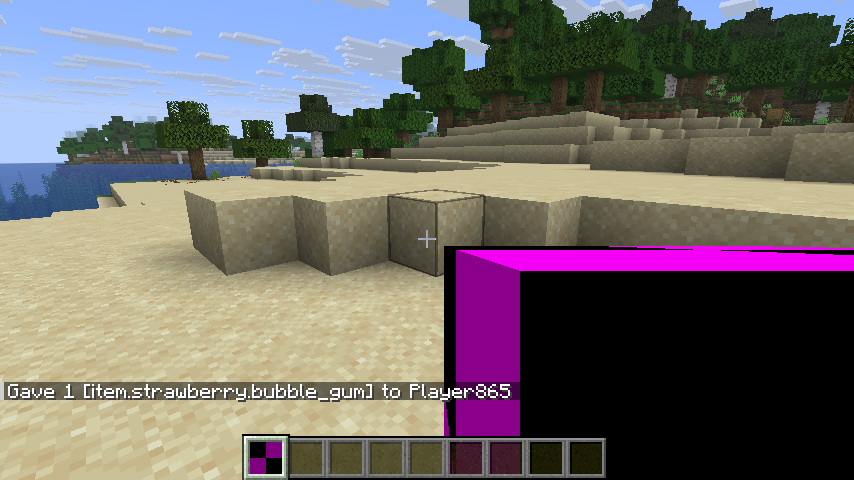
You should receive your brand-new item! You can’t yet do anything with it. It’ll also probably look like a purple-and-black checkered cube—that’s the placeholder texture Minecraft uses when no model is defined. Don’t worry, after we add our first placeable block, we’ll fix that next.
Congrats! You just added your first custom item to Minecraft. 🎉

Hi! Excellent tutorial 🙂
I was able to make a food item that applies an effect when consumed, using your tutorial and a little bit of help from the Fabric documentation.
Similarly, I want to create a sword that applies a setonfire() effect to the mobs it hits and I can’t seem to find a way to do it. All the tutorials i found use depreciated methods that return errors. Do you have any tips?
many thanks! Looking forward to your next tutorials.
Hi! Thanks so much for the kind words—I’m really glad the tutorial helped!
That’s a fantastic idea for a follow-up. Creating a sword that sets mobs on fire is a great way to explore custom tool behavior, and you’re right—most tutorials out there are a bit outdated on that front. I’ll be writing a new blog post on exactly that in the next couple of days, so stay tuned! Thanks again for the inspiration 🙂