Now that we’ve added our first custom item and block to Minecraft, it’s time to make them feel like real, polished parts of the game. Right now, our bubble gum item and block technically exist—but they’re missing all the extras that make them feel complete. They don’t have proper textures or names, and don’t show up in the creative menu.
Previously, we added our first block. Before that, we added our first item.
In this tutorial, we’ll give both of them a basic pass—just enough to make them usable, recognizable, and playable. With just a few more files and a bit of code, your creations will go from placeholder cubes to fully integrated Minecraft content. We’ll cover:
- How to assign models and textures
- How to add names using language files
- How to place items in creative tabs
Each of these features will get its own dedicated tutorial later, but for now, we’re focusing on the essentials to help your mod feel like it truly belongs in the Minecraft world.
Models and Textures: Giving Your Content a Look
Right now, your bubble gum item and block probably look like purple-and-black checkered cubes. That’s Minecraft’s way of saying, “I don’t know what this is supposed to look like.” Let’s fix that.
Minecraft separates what something does (Java code) from how it looks (assets like models and textures). You define those visuals using JSON files and PNG images, stored in your mod’s resources folder. There are two kinds of models we’ll cover here:
- Item models – control how the item appears in your inventory or hand.
- Block models – define how blocks look in the world, including shape and textures.
Textures are just simple PNG images—usually 16×16 pixels—stored in the textures folder. Models are JSON files that tell Minecraft how to apply those textures to the item or block.
To make things easier, I’ve put together a couple of simple textures for our example content. You can download them and drop them directly into your mod’s resource folder, or use your own if you prefer. These textures will be used for our bubble gum item and block in both the world and the inventory.


Now that we have our textures, it’s time to drop them into the right place in our project. In a Fabric mod, textures are stored in a very specific folder structure inside the resources directory, which mirrors how Minecraft expects to load them.
For example, if your mod ID is strawberry, your texture files should go here:
src/main/resources/assets/strawberry/textures/item/
src/main/resources/assets/strawberry/textures/block/Place your bubble_gum.png in the item folder, and bubble_gum_block.png in the block folder.
Once your textures are in place, Minecraft will be able to find them—as long as we also give it the models and model definitions to use them. Let’s do that next.
Creating Basic Model Files
Minecraft uses model JSON files to tell the game how to render items and blocks—what textures to use, how they appear in inventory, and how they look in the world.
What are JSON files?
JSON (short for JavaScript Object Notation) is a simple text format used to store and organize data. It looks a bit like a list of labeled values, kind of like a digital version of filling out a form. Minecraft uses JSON files to define many things—like how an item looks, what a block is made of, or how crafting recipes work. They’re easy to read and write, and they help the game know how to handle your custom content. You’ll see a lot of .json files when making Minecraft mods, especially for anything related to models, textures, and behavior.
These model files live in:
src/main/resources/assets/strawberry/models/item/
src/main/resources/assets/strawberry/models/block/
Let’s start by creating two files: one for our bubble gum item, and one for the bubble gum block.
bubble_gum.json (Item Model)
src/main/resources/assets/strawberry/models/item/bubble_gum.json
{
  "parent": "minecraft:item/generated",
  "textures": {
    "layer0": "strawberry:item/bubble_gum"
  }
}
"parent": "minecraft:item/generated"means we’re using the flat 2D item model like most food or tools."layer0"points to our texture (no file extension needed).
bubble_gum_block.json (Item Model for Block)
src/main/resources/assets/strawberry/models/item/bubble_gum_block.json
{
  "parent": "strawberry:block/bubble_gum_block"
}
- This tells Minecraft: “When this item is shown in your inventory, use the block’s model to render it.”
- That means we now need to create the block model too.
bubble_gum_block.json (Block Model)
src/main/resources/assets/strawberry/models/block/bubble_gum_block.json
{
  "parent": "minecraft:block/cube_all",
  "textures": {
    "all": "strawberry:block/bubble_gum_block"
  }
}
"parent": "minecraft:block/cube_all"is a built-in template that applies the same texture to all six sides of the block.- The texture path should match your block texture.
What Are Item Model Descriptions?
Every item and block in Minecraft needs a corresponding item model description—a .json file stored in assets/yourmodid/models/item/. This file connects the item or block to its actual visual model and tells Minecraft how it should look when held, dropped, or viewed in the inventory.
Even blocks need item model descriptions! That’s because every placeable block has an item version (what players see in creative mode, hold in their hand, or drop on the ground), and that item needs a visual definition.
For a regular Item like bubble_gum:
src/main/resources/assets/strawberry/items/bubble_gum.json
{
  "model": {
    "type": "minecraft:model",
    "model": "strawberry:item/bubble_gum"
  }
}
model: This is the property that contains the reference to our model.type: This is the type of our model. For most items, this should beminecraft:modelmodel: This is the model’s identifier. It should have this form:mod-id:item/item_name
For a BlockItem like bubble_gum_block:
src/main/resources/assets/strawberry/items/bubble_gum_block.json
{
  "model": {
    "type": "minecraft:model",
    "model": "strawberry:item/bubble_gum_block"
  }
}model: This is the property that contains the reference to our model.type: This is the type of our model. For most items, this should beminecraft:modelmodel: This is the model’s identifier.ForBlockItems, it should have this form:mod-id:block/block_name- EDIT 8/5/2025: A small clarification—while the original example works, it oversimplifies how BlockItems are modeled in the inventory. For BlockItems, the
modelshould actually point tomod-id:item/item_name. That file (e.g.,models/item/bubble_gum_block.json) typically uses a"parent"likeminecraft:block/cube_allto render the item as a block. If you wanted a unique appearance for the item form—like Minecraft’s cauldron—you could instead use a different texture and a parent likeminecraft:item/generated. We might explore this in a future post.
We’re almost done! If you launched the game now, you might notice the model or texture for our bubble gum block still isn’t showing up, though regular bubble gum is. That’s because we haven’t told Minecraft how to use our block model yet—we still need to add a blockstate definition.
Creating a Block State Definition for bubble_gum_block
The blockstate file tells Minecraft which model to use when displaying your block.
For simple blocks like our bubble gum block—ones that don’t change based on direction, shape, or other properties—you only need a single model reference.
This file should go in your assets/strawberry/blockstates folder, and its filename should match the block’s ID from your ModBlocks class. So if your block is registered as bubble_gum_block, the file should be called bubble_gum_block.json.
src/main/resources/assets/strawberry/blockstates/bubble_gum_block.json
{
  "variants": {
    "": {
      "model": "strawberry:block/bubble_gum_block"
    }
  }
}
Now, assuming everything is in the right place—your item models, block models, item model descriptions, and blockstates—restarting the game should finally show your work in action:
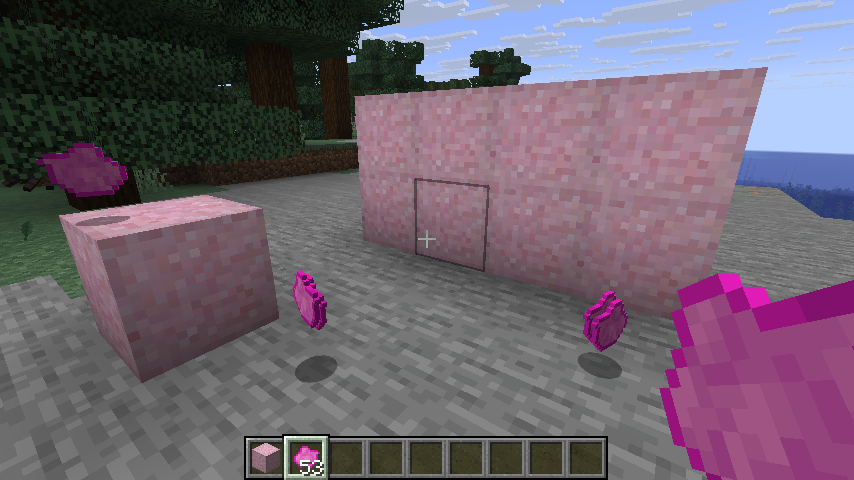
🎉 What a great success! Our bubble gum items are now visible, placeable, and ready to use. But before we start building with them, there’s still some polish left to apply.
Right now, these items probably still show up with names like item.strawberry.bubble_gum_block. Not very charming! To fix that, we’ll define proper display names using Minecraft’s language files. Let’s take a look at how they work.
Naming Your Content with Language Files
Minecraft uses language files to translate internal identifiers like item.strawberry.bubble_gum into readable names like Bubble Gum. These files live in your mod’s resource folder and follow a simple key-value format in JSON. They’re also how Minecraft handles internationalization—supporting multiple languages with separate files.
Let’s define names in English. Here’s what to do:
src/main/resources/assets/strawberry/lang/en_us.json
{
  "item.strawberry.bubble_gum": "Bubble Gum",
  "block.strawberry.bubble_gum_block": "Block of Bubble Gum"
}
How it works:
- The keys (
item.strawberry.bubble_gum) are based on your item or block’s registry ID. - The values (
"Bubble Gum") are what the player sees in-game. item.andblock.help Minecraft know where the name applies—whether in inventory, chat, tooltips, or when hovered over.
You can add as many entries as you like to this file, and later on, you can include translations in other files like es_es.json, de_de.json, etc.
Once this file is in place and the game is restarted, your content will finally have proper names in the UI!
EDIT 8/5/2025: A quick but important clarification! The filenames for language files follow a standardized format based on IETF language codes, like en_us.json for American English or es_es.json for Spanish (Spain). If you’re wondering what to use for a different language—like Dutch, for example—you’d use nl_nl.json. You can confirm these codes by checking the language folder inside the Minecraft JAR, referencing the Minecraft Wiki, or even by hovering over a language in the in-game language menu. This ensures your translations load correctly and appear as expected!
Let’s go ahead and create a second language file for Spanish. Just like the English version, it should be placed in your mod’s resource folder and follow the same structure.
src/main/resources/assets/strawberry/lang/es_es.json
{
  "item.strawberry.bubble_gum": "Chicle",
  "block.strawberry.bubble_gum_block": "Bloque de Chicle"
}
To test this:
- Launch Minecraft.
- Go to Options → Language.
- Select Español (España) or any other Spanish variant that uses
es_es. - Load into a world and check your bubble gum item and block names.
If everything is working correctly, you should now see Chicle and Bloque de Chicle instead of their English names.
🎉 Congratulations—your mod now supports multiple languages!
Adding Items to the Creative Inventory
So far, we’ve created a custom item and block, given them models and textures, and even localized their names—but they’re still nowhere to be found unless you use commands.
In this section, we’ll walk through how to add your items and blocks to the Creative Mode inventory. First, we’ll add them to existing vanilla tabs (like Food & Drinks or Building Blocks) so they feel like part of the natural game. Then we’ll go a step further and create our own custom Creative tab, a dedicated inventory category where all your mod’s items can live.
This makes it easy to test your content, share it with other players, and start building immediately—no /give commands required.
To add our items and blocks to our existing Creative tabs, we’ll need to add a line of Java code to the initialize method in both ModItems and ModBlocks:
src/main/java/dev/epicbunny/strawberry/ModItems.java
public static void initialize() {
// Called during mod initialization to register our items.
// Get the event for modifying entries in the food and drink group.
// And register an event handler that adds our bubble gum to the food and drink group.
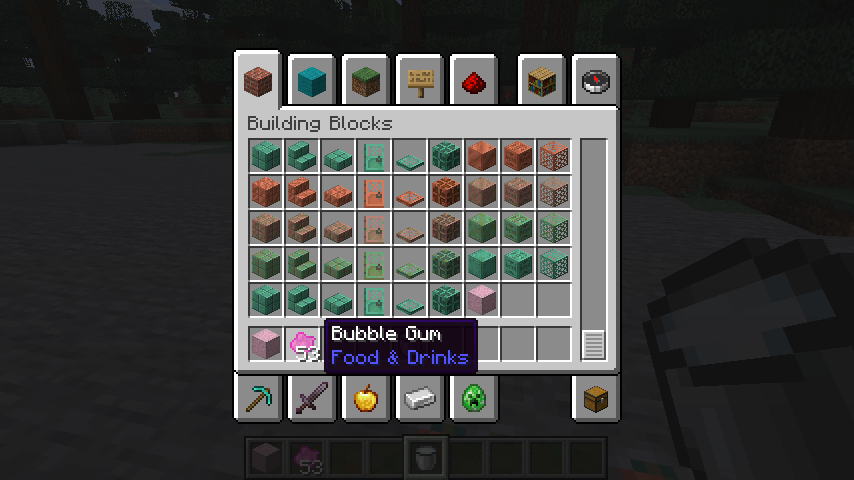
ItemGroupEvents.modifyEntriesEvent(ItemGroups.FOOD_AND_DRINK)
.register((itemGroup) -> itemGroup.add(ModItems.BUBBLE_GUM));
}
This code tells Minecraft to add your custom item (BUBBLE_GUM) to the Food & Drink section of the creative inventory.
ItemGroupEvents.modifyEntriesEvent(...)is a Fabric API helper that lets you modify the list of items shown in a specific creative tab. In this case, we’re targetingItemGroups.FOOD_AND_DRINK, which is Minecraft’s built-in food tab..register(...)is how you tell Fabric what changes to make when the tab is built. You pass in a small function that says what to do.(itemGroup) -> itemGroup.add(...)is a lambda function, which is just a short way of writing a function that takes an argument (itemGroup) and performs a simple action. Here, it tells Minecraft to addModItems.BUBBLE_GUMto the tab.
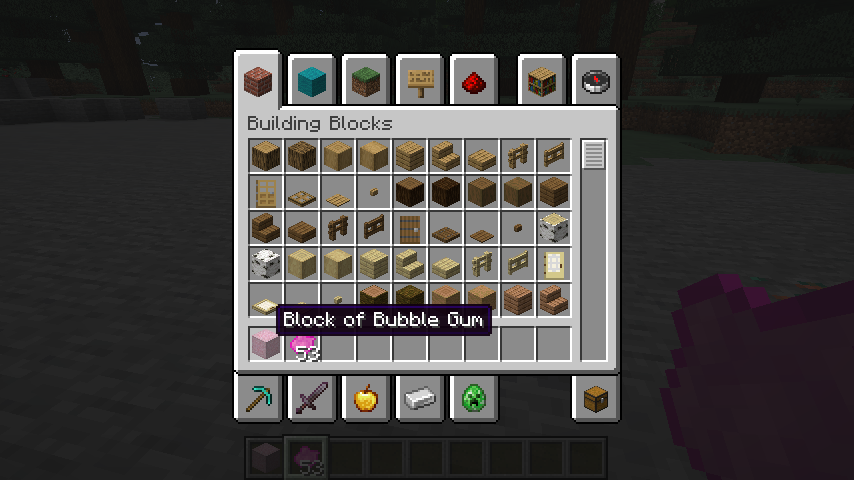
We’ll add a very similar line to ModBlocks as well:
src/main/java/dev/epicbunny/strawberry/ModBlocks.java
    public static void initialize() {
        // Called during mod initialization to register our blocks.

        // Get the event for modifying entries in the building blocks group.
        // And register an event handler that adds our gum block to the building blocks group.
        ItemGroupEvents.modifyEntriesEvent(ItemGroups.BUILDING_BLOCKS)
		        .register((itemGroup) -> itemGroup.add(ModBlocks.BUBBLE_GUM_BLOCK));
}As we add new features and methods to our classes, you’ll occasionally need to import additional classes or packages. IntelliJ IDEA will highlight anything missing in red, and you can use its quick-fix tools to automatically add the necessary imports to your files. For those examples, you’ll need to add the following:
import net.minecraft.item.ItemGroups;
import net.fabricmc.fabric.api.itemgroup.v1.ItemGroupEvents;
As a heads-up, we won’t be listing import statements in most examples from here on out—unless they’re important to the topic or part of a full code snippet. Now that your items are added to the proper creative tabs, you’ll find them at the bottom of those sections in the creative menu, complete with their tooltips!
And that’s it for now—your bubble gum item and block are no longer just invisible placeholders! With models, textures, names, and creative inventory access in place, they’re ready to be played with and tested in-game like any other Minecraft content.
We’ve only scratched the surface here. Each part of what we covered—models, languages, tabs, and more—has tons of depth and customizability, and we’ll dive deeper into those systems in future posts. But for now, you’ve got everything you need to start making your mod feel real.
Next up, we’ll dive into the basics of crafting in Minecraft. You’ll learn how to create crafting recipes for your items and blocks using JSON files, so your content can be crafted naturally in survival mode—no commands required. Whether it’s turning ingredients into bubble gum or packing it into a block, crafting is where your mod starts to feel like part of the core game. See you in the next tutorial!

I’m following this guide but my resources folder contains assets.strawberry as a folder, not assets/strawberry. I assume I can just create a items and blocks folder inside assets.strawberry. but some insight on this would be nice.
Hi jevry!
Apologies for the late reply—I took a short break from the blog and I’m still getting used to WordPress’s comment system, so I didn’t see your message right away. Thanks for your patience!
As for your question: in IntelliJ, the assets.strawberry part can look like a single folder due to the way it displays Java-style packages. But under the hood, it’s actually saving them as nested folders—assets/strawberry—just like Minecraft expects. I recommend double-checking in your file browser (like Windows Explorer) to confirm. Chances are everything is working just fine!
Let me know if anything still seems off and I’ll be happy to help more.
I think there is a mistake in the item model description section of this tutorial. The directories you list are
src/main/resources/assets/strawberry/models/item/bubble_gum.json
src/main/resources/assets/strawberry/models/item/bubble_gum_block.json
when they should be
src/main/resources/assets/strawberry/items/bubble_gum.json
src/main/resources/assets/strawberry/items/bubble_gum_block.json
You seem to be absolutely correct! I often got confused writing this section and it doesn’t surprise me at all this got overlooked. I will correct it now. Thank you very much!